Today I published a Review of The New Southern Table on my Cookbook Review site, CookbookAuthority.com. In addition to the review, I provide the full recipe for Sweet Potato Gnocchi with Sage Brown Butter Sauce. The recipe for the Gnocchi comes from Brys Stephen's cookbook, but I actually made up the Sage brown butter sauce myself (I was inspired when I found out we have a sage bush growing in our backyard!)
Sweet Potato Gnocchi
The Gnocchi is chewy, but light with just the right hint of sweetnees. The brown butter sauce is tangy, decadent and delicious! I was a bit intimidated to make gnocchi, but it turns out that it's really easy to make. Stop on over and get the recipe for Sweet Potato Gnocchi. The Mad Scientist, Littlest and I all loved it, and I am definitely going to make it again.
Grilled veggies are the perfect side for your Memorial Day Picnic
Do you have a distinct memory of the first time that you thought you were an adult? My first memory of feeling like an adult centered around food. When I was about seven or eight years old, my family hosted an exchange student from Thailand. When we hosted her, my mom started cooking tons of stir fries. It seems like we ate stir fry every night that Tum lived with us, and after that, my mom didn't throw in the towel with the stir fries because she rightly thought that stir fry is pretty much the most delicious weekday meal that you can make. I didn't mind the stir fry craze that was sweeping the kitchen, but there was one part that I didn't like... the vegetables. I tried really hard to be a good healthy kid, but I didn't like how the vegetables tasted in the sauce. Now this is not to say that my mom did a poor job cooking vegetables. No, my mom is one of the most wonderful vegetable chefs that I know. I simply did not like the vegetables in stir fry; I only liked vegetables raw. This distaste persisted for years, mostly as a repressed feeling as I sadly ate an appropriate serving of vegetables, so I could guiltlessly indulge in the delicious meat, rice and sauce. If I complained about the vegetables, I apologize. Then in eighth grade, my friend Laura broke her femur. She was regulated to a wheel chair for the entire summer, so I biked over to her house every day and we hung out. We made caramel corn, did puzzles, read Gone with the Wind, and otherwise passed the time doing not that active of activities. One afternoon, she asked me to pick a few snap peas from her parents garden, which I did, and then she decided that I would make stir fry for our lunch. It would be a vegetarian stir fry since the internet told us horror stories about Salmonella poisoning and E. Coli, so we were terrified of touching chicken lest we kill ourselves in the process. I wasn't overly fond of the idea, but I didn't have any better one (no pizza in the freezer), so I went with it. I don't remember the exact ingredients, but it was pretty basic. Maybe just a little sweet and sour sauce and some soy sauce in a frying pan with a few vegetables, but the aroma was enticing. I remember watching the vegetables cook and thinking, "I want to eat this. I actually want to eat vegetables." I felt so responsible, cooking a nutritious meal for me and my friend, and when we sat down to eat, I downed that plate of vegetables, and I liked it! Right then and there, I felt like and adult because I liked vegetables. That day was a turning point for me, and since then, I've started to love vegetables, and I enjoy making them the star of my meal especially when I don't have to sacrifice flavor. These grilled vegetables are my quintessential example where the vegetables are the star. Sure, we will eat rice or chicken or something else with these vegetables, but honestly a plate groaning with these vegetables is just about the perfect summer meal for me. The balsamic vinaigrette marinade imparts an almost meaty quality to the mushrooms, and it brings out the natural sweetness of the others, and a charcoal grill gives these veggies a smoky flavor. The peppers end up smoky, sweet and acidic; the mushrooms are tender and meaty, and the strength of the onions gets neutralized by the marinade and the grill resulting in a sweet, mildly pungent side. I can't quite find the word to describe the squash and zucchini, so I am going to say that grilling them brings out the planty flavor that I couldn't quite get enough of, so I kept coming back for more and more and more. My recipe has been adapted from Julie and Charles Mayfields' book Paleo Comfort Foods which is one of the best cookbooks in my arsenal, and I don't even pretend to eat Paleo. (Link is an Amazon Affiliate). When you make these veggies, make more than you can possibly eat, because they make the best leftovers. For example tomorrow I will share a chicken and veggie wrap, or you can make a seriously awesome omelette with any remaining veggies. You know who else loves vegetables? My little man.
He looks like such a little man now.
Do you have any food=adulthood moments? If so let me know in the comments.
print recipe
Grilled Veggies
by Hannah Rounds May-20-2014
These perfect grilled veggies are the perfect side for your summertime picnics
Ingredients
3 Small Zucchini - Thinly slice lengthwise
4 Small Summer Squash - Thinly slice lengthwise
1 Red Onion - Thickly Sliced
5-6 Mini Sweet Red Peppers - Sliced
12 Mushrooms- Sliced
1/2 Cup Balsamic Vinegar
1/4 Cup Olive Oil
1 Teaspoon Garlic Powder
1 Teaspoon Salt
1 Teaspoon Pepper
1 Tablespoon Italian Seasoning
Instructions
1. Place mushrooms and peppers in a small bowl, and squash, zucchini and onions in a larger bowl.2. Whisk balsamic, oil, and spices thoroughly.3. Pour 2/3 of marinade on squash and onion mixture, and pour the rest onto the mushroom and pepper marinade4. Let veggies marinade for at least 30 minutes.5. Lay zucchini, squash and onions on open grill with a low flame.6. Place Onions and peppers on foil or a grill pan also over a low flame.7. After about 8-10 minutes flip zucchini, squash and onions.8. After another 5-7 minutes begin removing vegetables. They should be tender but not limp.
Details
Prep time: Cook time: Total time: Yield: 4 Generous Servings
Sweet and Mellow vegetables combined with aromatics and heat to create a heavenly lentil curry.
Recently, I learned about "Wonderpot". No, this is not something that you can now legally buy in the Mile High City (pun). Rather, this is a one pot dish that was pioneered by Budget Bytes. Basically, you throw all the ingredients into one large pot, let it simmer and your dinner is magically delicious (much like a bowl of Lucky Charms only, you know, satisfying). Even though I love to cook, easy and satisfying is something that I am for most week nights. These one pot wonders are a serious sanity saver and since they are on the site Budget Bytes, I assume they have low cost per serving too. Since its Indian (or British as the case may be) Food Week here on Crowdsource My Dinner (Did I announce that yesterday? It is.), I've decided to make a "WonderPot" of sweet potato, spinach and lentil curry. Lentils lend themselves really well to wonderpots, because they require simmering which means they have plenty of time to absorb the yumminess from other flavors (such as coconut milk, onions and garlic). This is definitely the easiest recipe that I've created in a long time, and one of the most delicious. The flavor of this wonderpot is out of this world. Creamy sweetness from the coconut milk, tender chew from the lentils, a little bit of acidity from the tomatoes, spicy and herbacious goodness from the aromatics. When I first started throwing ingredients into a pot, I worried about was that this would end up being mushy, but the lentils held their shape and texture really well, and created a distinctly non-mushy texture (the opposite of mushy is crunchy, but this is decidedly not crunchy). Enjoy!
print recipe
Sweet Potato, Lentil and Spinach Curry
by Hannah Rounds May-6-2014
This one pot wonder curry is as easy to prepare as it is delicious.
Ingredients
1 Very Large Sweet Potato- Diced
1 Can Full Fat Coconut Milk
1.5 cups Stock (vegetable or chicken)
1 Medium Onion- Diced
3 Cloves Garlic- Minced
1 Can Diced Tomatos
3 Tablespoons Garam Masala
1/2 Teaspoon Tumeric
1 Teaspoon Salt
1 Cup Lentils Rinsed
2 Cups Packed Spinach
1/8 Bunch Cilantro
1 Dollop per Bowl Greek Yogurt
Instructions
1. Soak lentils for at least 45 minutes then rinse them.2. Add sweet Potatoes, tomatoes, stock, coconut milk, onion, garlic and spices to a pot and bring it up to a slow simmer for 20 minutes.3. Add lentils and allow pot to simmer 20-30 more minutes.4. Add spinach and allow it to wilt (2-3 minutes)5. Serve curry with yogurt and freshly chopped cilantro (and naan bread or rice are nice side choices)
Details
Prep time: Cook time: Total time: Yield: 4 Servings
Colorful food is fun to eat, and dressing makes it delicious!
My college years were salad glory days. Our dining hall made some pretty incredible food, all things considered, but the salad bar was the stuff of legends. It had spinach, iceberg lettuce, soy beans, tofu, little baby corns, carrots, olives, tomatoes, cucumbers, peppers, boiled eggs, hummus, and on and on and on.
It was popular to take two large bowls, fill one with veggies and dressing and use the other as a lid and shake the salad up for an even distribution of dressing and salads. Like a McSalad Shaker, only big, and with more than three ingredients. While most people used a two handed approach to shaking the salads, I distinctly remember having a cross country teammate who bragged that he could shake these bowls with one hand... and he could. I was impressed.
However, his bragging about his salad shaking ability (shaking what his mama gave him as he put it) often prompted competitions of machismo which inevitably resulted in the other competitor dropping salad everywhere. Our poor dining hall workers.
These days, I wouldn't be nearly as impressed with the size of his hands or his salad shaking abilities, because for a few months, I worked with a guy whose hands were the size of kleenex boxes. He could probably palm a basketball the same way I can palm a softball.
As I was going to say, before I so rudely interrupted myself with reminiscing is that post-college, I never thought I would be able to make salads nearly as well as I did in college due to a lack of an appropriate salad bar. I don't know about you, but I don't think the 8 foot by 8 foot kitchen shared by four women in my first post college home wasn't exactly conducive to industrial sized salads. I pretty much gave up salading altogether.
That was until I started reading food blogs about a year ago, and I noticed recipes for salads. And the recipes weren't just dump everything into a bowl and shake. It was actually a thoughtful combination of a reasonable number of ingredients. "Self, you can do that," I thought to myself, and I could. I didn't have to buy the entire produce section, just enough ingredients to make me a healthier person, and the rest could be rounded out with things I already had on hand.
This salad comes close to one that I would have eaten in college. Just a basic bowl of crisp delicious veggies, with the crunchy addition of uncooked ramen. It's really the dressing that makes this a salad worth sharing. Rather than being primarily cream or vinegar based, this one is actually aromatic based, so its a really unique flavor. The dressing is a combination of onions, garlic, carrots, ginger, fish sauce, vinegar and sesame oil pulsed together until it becomes a sauce. The flavor is what would happen if ceasar dressing and ponzu sauce got married and had babies, but in a good way.
Be warned, you will want to brush your teeth after this one.
Like all salads, the best way to eat this would actually be to add some meat to the salad, but for the purpose of the post, I kept it simple. I hope you enjoy!
print recipe
Spinach Salad with Ginger Carrot Dressing
by Hannah Rounds May-1-2014
Enjoy a delicious salad with an aromatics based dressing
Ingredients
2 Carrots - Finely Grated- Divided
1 Red Onion- Finely Sliced- Divided
1 Clove Garlic- Pressed
1.5 Inches Ginger Peeled
1 Teaspoon Fish Sauce
2 Tablespoons Sesame Oil
1-2 Teaspoons Rice Vinegar
Up to 2 Tablespoons Water
3 Cups Spinach
1 Yellow Bell Peppers- Diced
1/2 Cucumber- Thinly Sliced
1 Package Uncooked Ramen Noodles
Instructions
1. In a food processor combine 1/2 of carrots, red onion, garlic, ginger, fish sauce, sesame oil and vinegar. Pulse until smooth. Add water if necessary.2. Toss vegetables with dressing and enjoy
Details
Prep time: Cook time: Total time: Yield: 2 Servings
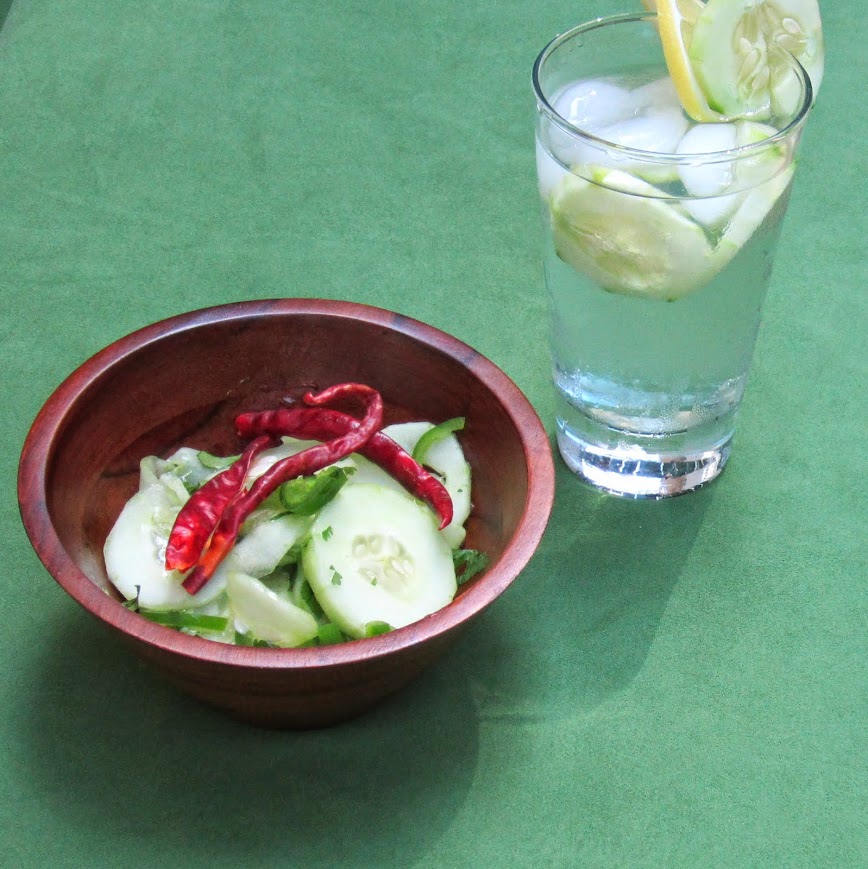
Do you know what was trendy when I was in college? Water bottles (#WatBot). We were all trying to save the Earth one refill at a time. And the fact that I lost about fifteen water bottles over the course of four years? A small price to pay for a more sustainable future... I guess. These days, I just drink my water straight from a glass (or if I'm in the mood for snazzy water I add cucumber, lemon, and basil to a pitcher that I keep in the fridge), and every time I take a sip of water, I feel downright self righteous about the whole thing. I'm improving my health, I'm not causing the Earth any harm, my skin is glowing, and everything is right with the world. Now, what if you could take that water drinking feeling and apply it to food? Enter this cucumber salad. Of course, eating salad is a great way to serve penance for your food sins, but that's not what this salad is about. Nor is about shoving as many antioxidants into your mouth as possible (that's what a chia-acai-blueberry-coffee smoothie is for). Moreover, its not even about paleo one-upmanship. This is just a refreshing, feel good salad. The salad is nothing more than thinly sliced cucumbers that are lightly pickled in lemon juice and salt, tossed with a little olive oil, some cilantro, a touch of sugar for sweetness, and jalapenos and red pepper flakes for spice. It's simple, and its delicious, the perfect balance of sweet, sour and spicy for a late spring day. The inspiration for this salad came fromthe Food Charlatan, and I loved her version. However, I felt that the salad needed just a little bit of sweetness, and I actually preferred the lemon over the lime (I discovered the lemon on accident because the Limes at the grocery store felt like little golf balls, so I purchased luscious, ripe, aromatic lemons instead). This salad keeps for at least three days in the fridge (it might keep for longer since its basically pickles, but I wouldn't know since we eat it pretty quickly after making it), and for maximum deliciousness I do recommend letting it do its marinating thing in the fridge for a few hours. With cucumbers selling for about a nickel a piece, I've been making a ton of this salad and eating it as an after run snack. It sort of feels like edible hydration, and I love it. Make it today! It's so easy and all the ingredients are normal, so you won't even have to run to the store (unless you have no cucumbers, then you have to wait to make it.)
2 Cucumbers- Very Thinly sliced (these should be bendable)
1 Lemon Lemon Juice
1/2 Teaspoon Salt
2 Tablespoons Olive Oil
2 Teaspoons Sugar
2 Jalapenos- Finely Diced
1/2 Bunch Cilantro
Instructions
1. Whisk lemon juice, salt, olive oil and sugar. Add finely minced garlic if desired.2. Coat cucumbers, jalapenos and cilantro in the dressing then cover bowl3. Allow salad to marinate at least three hours before serving
Details
Prep time: Cook time: Total time: Yield: 6 Servings
If you thought parsley was a garnish, you've never eaten Tabouli Salad.
Has anyone ever had an experience where they experienced something as an adult which retroactively ruined their childhood. I had one of those a few months back... Perkins. Growing up Perkins was sort of a fancy restaurant that we went to with my grandparents or parents after certain events like Piano recitals or basketball games. (In retrospect, I was a sweaty eleven year old in sweats, so I don't know why I thought of Perkins as fancy).
In my minds eye, Perkins was fancy (the only restaurant from my childhood that had parsley on the plate) and incredibly delicious. I remember the big juicy burgers and the amazing shakes.
So, when we were driving to Raleigh from Minneapolis, I begged Rob to stop at Perkins for just one meal. Though he applied to my sensibilities, I insisted. And when we sat down, the table was a little sticky, and there were other crying babies with sticky mouths and the booths were a little sticky too. My burger was a little overdone, and not really anything special, and I was too carsick to order a shake.
I ruined it. Perkins is fine, edible, American cuisine, but it was so perfect in my memories that I cannot believe that I would allow myself to sully the past by going into a Perkins restaurant as an adult.
As a parent, I wonder how many more opportunities I will have to retroactively ruin my childhood. Does the zoo suck? What about water parks? Are picnics even fun? Is summer really the best season?
(Since I need a little validation, here's a link to someone who had a similar experience to mine).
Even though Perkins is ruined for me, I will still hold some memories dear. Like the time my cousin Bjorn tried to convince me that if I ate the parsley on my Omlette plate it would kill me, and I ate it and didn't die. Afterwards, I asked my mom if parsley was edible, and she said something about edible garnishes like rose petals (which I took to mean no).
It turns out that parsley is not just great for garnishing plates at large chain diners, it actually has a great flavor too. I've eaten it in stuffed chicken, on pastas and other Italian dishes, but one of the best uses for parsley is in cold salads especially this Tabouli Salad.
I made this salad since I've made a public commitment to not buying more rice until our 20 lbs of couscous is used up, but I once again have found that this is actually a dish worth eating and sharing. Couscous is arguably best eaten cold when the grains have the opportunity to show off their pearl like texture rather than taste sort of weirdly gritty. This tabouli salad is light on the palate, citrusy, quick to fix and overall delicious. I hope you enjoy this (however, if you are going to buy couscous consider a small 1-2lb bag).
On an unrelated note, Littlest has two teeth, but they are just barely poking through so no pictures just yet.
Tabouli Salad
by Hannah Rounds
This tabouli salad is the perfect summertime side. With cold couscous's pearly texture taking center stage accented by herbacious parsley and zesty lemon
Details
Prep time: Cook time: Total time: Yield: 6 Servings
Ingredients
1 Cup Couscous
Approximately 2 Cups Boiling Water
3 Cloves Garlic pressed (or minced)
1 bunch Parsley Chopped
3 Roma Tomatoes Diced
3 Green Onions Finely sliced
1 Lemon's worth Lemon Juice
1/2 Teaspoon Salt
1/2 Teaspoon Pepper
2 Tablespoons Olive Oil
Instructions
1. Pour water on couscous and allow the couscous to absorb the water.2. Allow couscous to cool for a few minutes.3. Add lemon juice, olive oil and garlic to couscous and mix thoroughly4. Add salt and pepper until you like the flavor of your couscous. Then add the rest of your ingredients and mix thoroughly.5. Set salad aside for at least 30 minutes. You can store this in your fridge for several days.
Warm pita bread- fresh from the oven. Delicious and actually easy to make!
I did it! I actually created a baked good that is worthy of sharing on this blog! Okay, I did make these pretzels and this grapefruit quick bread but those don't count because sugar hides a multitude of sins (except gluttony).
This pita bread is actually quite easy to make and the hands on time is minimal, but it is about a day and half long project and requires storing the dough in the fridge, so be sure you clear out space before you embark on this journey. You might also consider bringing some friends along for the ride. I brought Littlest. He ate frozen peas while I mixed the dough, and by the time he finished his peas, I was done with the hands on part for the day. The next day, he took a nap and I finished the pitas.
The inspiration for these came from a repin of a recipe that is no longer available on Damn Delicious but I'm linking there anyways because that is some good food (or at least good food photography which I appreciate more every day). She apparently used to have a recipe for a pulled pork Gyro, which is a great idea because really who knows how to cook lamb. Not to mention that's like $27 a pound around here (possibly slight exaggeration, they don't actually sell it at the two closest grocery stores, so I wouldn't really know the price).
Anyhow, the Pin inspired me to make homemade pitas, and for once in my life it worked. I had to adapt this recipe from Smitten Kitchen because my first few didn't turn out like I would have liked.
Once I got the technique down, the pitas poofed beautifully with a pocket of steam and a single slice yielded that traditional pocket that just waits to be stuffed with all kinds of Greek goodness (or lets be honest here, turkey and Sriracha work nicely too).
Deb of Smitten Kitchen compares the process of making these to the process of making pizza dough, but I disagree somewhat. If you've ever done the "wet dough" technique associated with artisan bread in 5 minutes a day (sorry no link, to lazy and I'm not Amazon affiliate so there's really no point in my Googling this on your behalf) its more like that. The basic difference is that with pizza dough, the rise really isn't that important, but with pita bread the rise is very important.
Also, before you start you're going to need some essential tools.
Large 2 Quart Mixing Bowl (Ice cream buckets work too)
Rolling Pin
Plastic Wrap
Homemade Pita Bread
by Hannah Rounds
Pita Bread- It's like a carb pocket ready to be filled with Greek goodness
Details
Prep time: Cook time: Total time: Yield: 6 Full Pitas
Ingredients
3 Cups +1/2 Cup for sprinkling Flour
1.3 Cups + A few teaspoons for sprinkling Warm Water
2 Tablespoons Sugar
2 Teaspoons Yeast
1 Teaspoon Salt
2 Tablespoons Olive Oil
Instructions
1. Mix water, yeast and sugar and allow yeast to proof ten minutes.2. Add three cups flour, salt and olive oil and mix well. Then knead the dough briefly (2-3 minutes) and allow dough to rest 10 minutes3. After resting, flour surface generously and begin kneading the dough. You may find that the dough gets too dry or to sticky. Add more water when the dough is too dry or more flour when its sticky. Knead for about five minutes4. Oil a bowl and put dough in the bowl to rest. Cover with plastic wrap and place in the fridge for at least eight hours (but don't ignore my next instruction)5. For the first four hours of the rise, punch the dough down about once per hour.6. When you are ready to make the pitas, flour a large surface, then grab a chunk of dough and make a ball about the size of a tennis ball. Flatten the ball into a disk (about the size of a CD)7. Cover the disk in oiled plastic (reuse the covering of the bowl) and then repeat for all 6 pitas.8. Allow dough to rest under the plastic for about 10-20 minutes.9. Using a floured rolling pin on a floured surface roll out on pita disk at a time. The dough should be thin but not see through. Put the flat dough on a plate to rest. Generously rub the dough with water. If the dough starts to tear, you screwed up and you should start back on step 6 with that particular ball of dough.10. Heat oven and a baking tray to 475 (ie put the baking tray in the oven while it preheats)11. Place one pita on the hot baking tray and bake for four minutes and 15 seconds (basically for 45 seconds after the dough poofs, but the pita shouldn't be brown yet).12. If you resist eating it right away, it's nice to cover these with a clean tea towel
Black Bean Balls! Alliteration makes all food delicious!
Today, I had a rather odd and off topic conversation at work about cheating in school verses "cheating" in the workplace. The biggest hurdle that many of us had to overcome in joining the workforce from our education is that cheating is not only fine, its encouraged. Meaning, you should never write code from scratch if there's already code existing. You should never do a project that's been done before because its a waste of time.
And it struck me, that is why I've started this blog. Because I love to learn and discover and grow, and I want to let my project lead me instead of my deadlines. But there's not time for that at work, because...work. Upon further reflection, I've realized this blog isn't totally original. In every post I have several links to other blogs or recipes, and I'm not totally sure that I'm making something better. I'm okay with this, but it does mean I am not a genius yet, at least not by the talent borrows, genius steals paradox proposed by T.S. Eliot. T.S. Eliot wrote, "One of the surest tests is the way in which a poet borrows. Immature poets imitate; mature poets steal; bad poets deface what they take, and good poets make it into something better, or at least something different. The good poet welds his theft into a whole of feeling which is unique, utterly different than that from which it is torn; the bad poet throws it into something which has no cohesion. A good poet will usually borrow from authors remote in time, or alien in language, or diverse in interest." Nobody except Picasso ever claimed that they were great from the beginning, and the 10,000 hour rule proposed by Malcolm Gladwell seems to be pretty well accepted as pop-sociology fact, so I hope that someday I will no longer be a blogger who defaces what I borrow, but who steals content only to make it better. In the meantime, I would like to thank all the recipe bloggers and other sources of inspiration for giving me free access to your work and your life. I am really thankful that you enable me to crowdsource my dinner. Thank you all for allowing me to philosophize over this triviality of a blog. And onto the recipe. These black bean "meatballs" are incredibly delicious, I got this inspiration from Foxes Love Lemons. I definitely like them better than any real meatballs that I've ever had. I would compare the texture favorably to falafel, but the flavor is distinctly Italian. Within one bite, the Mad Scientist told me that these were on the keeper list, and Littlest screeched with delight every time I gave him a bite. Its so fun for me be able to feed Littlest the same food as the Mad Scientist and I eat.
Black Bean "Meatballs"
by Hannah Rounds
This meatless main dish is hearty and delicious, and better than any real meatballs that I've ever eaten.
Details
Prep time:
Cook time:
Total time: <
span class="value-title" title="PT4H30M">
Yield: 10 golf ball sized pieces
Ingredients
1 Cup Dried Black Beans- Soaked overnight and rinsed
1 Tablespoon Garlic Powder
2 Teaspoons Salt
1 Tablespoon Italian Seasoning
1/2 White Onion Chopped
4 Cloves Garlic Minced or Pressed
1 Egg
1/2 Cup Flavored Bread Crumbs
1-2 Tablespoons Olive Oil
Instructions
1. Cook beans with 2 cups of water, garlic powder, salt, and italian seasoning in a crockpot for four hours (low heat)2. Drain beans and set 2 cups in a large bowl (this should be most of the beans, but I always manage to have some leftover)3. Combine beans, onion, bread crumbs and egg and mix thoroughly using your hands.4. For balls about the size of a golf ball and set onto a plate. 5. Heat oil, and in small batches of about 3-5 pieces fry the meatballs. Be sure that each side of the meatball gets a nice crisp crust (should be a very dark brown)6. Serve with marinara sauce over pasta.
Attention everyone: grapefruit is a delicious addition to smoothies, and you should add it it to your next one. Thank you.
This could be the end of this particular post. And by adding a recipe to the end of this post, I run the risk of offending you. After all, you may think that I think that you're an idiot. Of course you know how to make a smoothie. How dare I suggest that I am adding additional value to your life by suggesting what other items go into a smoothie? You already know.
While we both know that you know how to make a smoothie, I have five reasons that you should continue to read this post through the recipe.
Special announcement regarding my sister in law!
Picture and explanation of the word Squajeema
Tips on harvesting the fruit of a grapefruit
Use of the word whiz
Recycled pun to close the post
1. Special announcement regarding my sister in law: She's pregnant! Congratulations, we are so excited for you and to welcome your little one into the world! When I was pregnant I loved grapefruit smoothies, and grapefruits are on sale at Aldi this week! (Em and I both love our Aldi).
What a cute fam jam! They'll be even cuter with a little squajeema!
2. The caption above used the word squajeema. This means tiny, cute little baby. See below:
Littlest as a squajeema!
3. Tips on harvesting the fruit from grapefruit. Grapefruits have a lot of fibrous bits that don't taste very good. I recommend that you cut the peel, skin and other fiber off of the grapefruit the same way you cut the skin off a butternut squash. Use a sharp knife, and don't worry that you might waste a tiny amount of flesh. You will still have plenty.
Remove all the peel, all the skin, and a bit of the flesh using a sharp knife
Then you can section the grapefruit for easy eating (or for blending into a smoothie).
Look at that fancy grapefruit!
Onto the recipe for number 4
Grapefruit Smoothie
Ingredients:
1. One Grapefruit sectioned
2. 1/2 Frozen banana sliced
3. Cantalope
4. Sweetened yogurt
5. Milk
Directions:
(Number 4) Whiz ingredients listed above (or others) in a blender, top with Granola if desired. Enjoy!
Em- since you have a growing (pun, she's growing a little baby) need for nutrients, this is a great way to get all those vitamins and minerals. Maybe even add some protein powder if you've been lacking on that front.